Written By:
Ms Ayushi Patidar
Volunteer-AFRS
Introduction:
The field of forensic science covers a wide range of topics, including anthropology, migration studies, and criminology. In order to help a scientist find answers to the numerous issues in the field, several biological samples have been used. Saliva is a readily accessible source from the victim as well as the attacker, parent-child, and siblings. To assist in identifying the components of salivary samples, several assays have been developed. This article deals with the wide utility of saliva examination as a forensic tool.
A complex biological fluid called saliva is secreted by the acinar cells of the major and minor salivary glands. It serves as a marker for different components of plasma. Its use as a forensic and diagnostic tool has received more attention in recent years and is currently being studied more thoroughly. It is essential to the genomes, proteomics, metabolomics, and bioinformatics fields as well as preserving the homeostasis of oral structures including tooth integrity. It serves as a gauge of salivary gland health and as a tool for drug and toxicological testing in forensic biology, making it a crucial distinguishing factor.
Various tests for Saliva:
1. Starch-Iodide Test
It is a simple chemical test used to detect the presence of amylase in saliva. Amylase is an enzyme that breaks down starch into simpler sugars. Here are the steps for performing the Starch-Iodide Test for saliva:
Materials needed:
• Saliva sample
• Starch solution
• Iodine solution
• Test tubes
• Dropper or pipette
• Test tube rack
Procedure:
Prepare the solutions:
a. Starch solution: Dissolve a small amount of starch (e.g., cornstarch or potato starch) in water to create a starch solution. The concentration is not critical, but it should be visibly cloudy when mixed with water.
b. Iodine solution: Prepare a dilute iodine solution by adding a few drops of iodine to a larger volume of water. It should be yellow-brown in color.
Label the test tubes:
Take several test tubes and label them to indicate the different samples you will test. For example, label one as "Saliva," another as "Starch + Saliva," and a third as "Starch (control)."
Collect the saliva sample:
Ask the person being tested to provide a saliva sample. They can spit into a clean container or directly into the labelled test tube labelled as "Saliva."
Test tube setup:
a. In the "Starch + Saliva" test tube, add a small amount (around 1 mL) of the prepared starch solution.
b. In the "Saliva" test tube, add the saliva sample collected in step 3.
c. In the "Starch (control)" test tube, add an equal amount of water as used for the saliva sample. This will be the control tube to show the original color of the starch solution.
Mixing:
a. Mix the contents of the "Starch + Saliva" test tube thoroughly to ensure the saliva and starch solution are well combined.
b. Mix the saliva sample in the "Saliva" test tube gently, but ensure it is well-mixed.
Add iodine solution:
a. Add a few drops of the dilute iodine solution to each test tube.
b. Observe and compare the color of the mixtures.
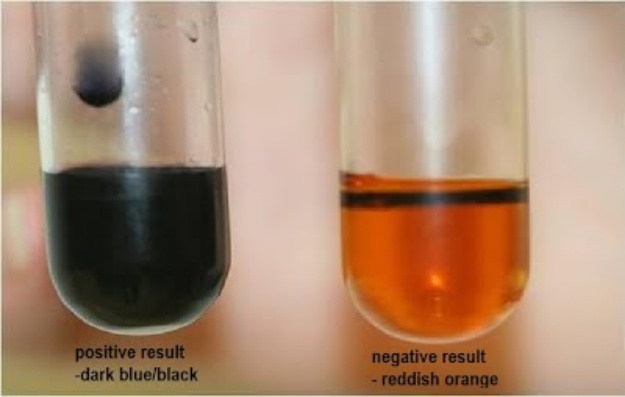
Interpretation:
a. The "Starch (control)" tube should remain a yellow-brown color, indicating the presence of starch.
b. The "Starch + Saliva" tube should show a color change to a blue-black or purple-black color. This indicates the presence of amylase in saliva, which has broken down the starch into simpler sugars.
c. The "Saliva" tube may not show any significant color change since it only contains saliva without starch.
2. Phadebas Test
Phadebas Amylase Test Kit (includes reagents with dye-starch complex)
• Saliva sample
• Graduated pipettes or droppers
• Test tubes or cuvettes
• Spectrophotometer (to measure absorbance) with a wavelength of 620 nm
Procedure:
Prepare the test:
a. Follow the manufacturer's instructions to prepare the Phadebas Amylase Test Kit. This kit typically contains reagents specific to the test, including a dye-starch complex.
Sample collection:
a. Ask the person being tested to provide a saliva sample. They can spit into a clean container or directly into a test tube.
Dilution of saliva sample:
a. Take a graduated pipette or dropper and measure an appropriate volume of saliva (e.g., 100 μL). Transfer the saliva sample into a test tube.
b., If necessary, dilute the saliva with a suitable diluent provided in the Phadebas Test Kit. Follow the manufacturer's instructions for the correct dilution factor. Note: The dilution may not be required if the kit is designed for direct testing of saliva without dilution.
Mixing:
a. Mix the diluted saliva sample thoroughly to ensure homogeneity.
Phadebas reagent addition:
a. Add an appropriate volume of the Phadebas reagent (dye-starch complex) to the test tube containing the diluted saliva sample. Follow the instructions provided in the test kit for the correct volume of reagent to be added.
Mixing after Phadebas reagent addition:
a. Mix the contents of the test tube thoroughly to ensure proper contact between the Phadebas reagent and the amylase in the saliva.
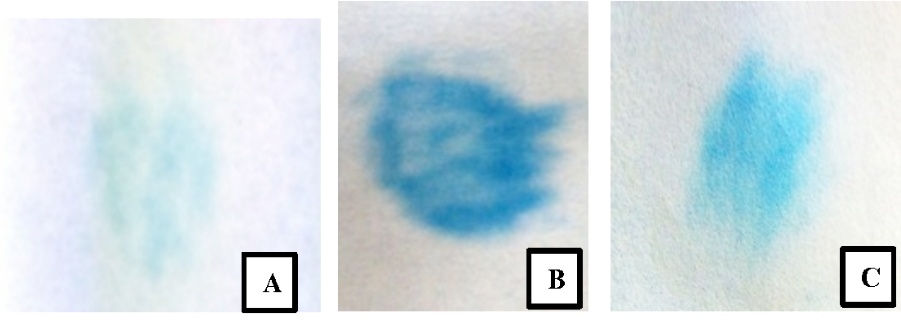
Incubation:
a. Allow the mixture to stand for a specific duration, as mentioned in the test kit instructions. This incubation allows amylase to digest the starch in the dye-starch complex, releasing the dye and turning the solution blue.
Spectrophotometer reading:
a. After the specified incubation time, use a spectrophotometer to measure the absorbance of the blue solution at a wavelength of 620 nm. This absorbance is directly related to the amount of amylase activity in the saliva.
Calibration (for quantitative analysis):
a. Prepare a standard concentration curve using known concentrations of the coloured dye provided in the test kit. Measure the absorbance of each standard at 620 nm.
b. Create a graph with the known concentrations on the x-axis and their corresponding absorbance values on the y-axis.
Quantitative analysis:
a. Using the calibration curve, determine the concentration of the coloured dye corresponding to the absorbance of the tested saliva sample.
b. Convert the dye concentration to the amylase activity in the saliva sample, expressed in units of amylase activity per liter of saliva (U/L).
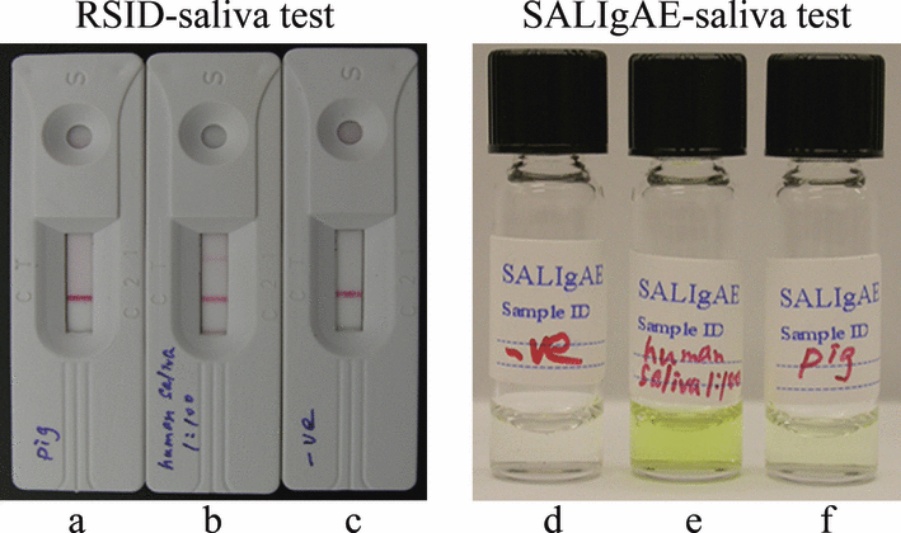
3. Immunochromatographic Test (RSID-saliva kit)
It is a rapid and simple method based on antigen-antibody interactions to detect the presence of saliva in a sample. Here are the steps for performing the test:
Materials needed:
• RSID-saliva kit (commercially available immunochromatographic kit)
• Saliva sample (as low as 1 μL)
• Timer or stopwatch
Procedure:
Prepare the RSID-saliva kit:
a. Follow the manufacturer's instructions to prepare the RSID-saliva kit. The kit should include all the necessary components, such as test strips, buffers, and reagents.
Sample collection:
a. Collect the saliva sample to be tested. As the RSID-saliva kit is sensitive, even a very small volume of saliva (1 μL) is sufficient for testing.
Test strip preparation:
a. Take out the test strip from the kit and place it on a clean and dry surface.
b. The test strip typically consists of a sample pad, a conjugate pad, a nitrocellulose membrane, and an absorbent pad.
Sample application:
a. Using a micropipette or a capillary tube, apply the saliva sample onto the sample pad of the test strip. Alternatively, some kits may come with a sample collection device that allows you to directly collect the saliva sample onto the test strip.
Incubation:
a. After applying the saliva sample, wait for the recommended incubation time, usually a few minutes (as per the manufacturer's instructions). This allows antigen-antibody interactions to occur on the test strip.
Interpretation of results:
a. Once the incubation time is complete, observe the test strip for the appearance of a pink line. A pink line will indicate the presence of saliva in the sample.
b. If the pink line is visible, it means that the antigen (present in saliva) has reacted with the specific antibodies on the test strip, leading to a positive result for saliva detection.
c. If no pink line appears, it indicates a negative result, and the sample does not contain saliva.
Timing:
a. Follow the manufacturer's instructions regarding the appropriate timing for result interpretation. Leaving the test strip for too long after the recommended time may lead to false results.
Proper disposal:
a. Dispose of the used test strip and other materials according to local biohazard waste regulations.